Ubuntu 24.04 Setup for Factoria Labs Trainings

A standard installation of GNU Radio 3.10 contains a vast array of functionality, but you can add quite a bit more with a few minutes of additional work. These Out Of Tree (OOT) modules expand the functionality of GNU Radio in ways that are valuable for people learning to use the software as well as experienced users. I provide a BASH script that installs these modules on my GitHub page, and recommend my students perform this installation before attending my classes.

What the Script Installs

The install script is located here, and you should definitely take a look it before running, as it does required admin privileges to run:
https://github.com/paulgclark/grc-install/blob/master/install_scripts/flabs_training_setup_24_04.sh

The script installs the following:

Install Process

There are three steps for installing this on your Ubuntu 24.041 machine:)

  1. Clone my GitHub repository
  2. Run the script
  3. Reboot and log in using Xorg display server

First, install git if you haven’t already:

sudo apt install git

Next, change to the install scripts directory and run the BASH script:

git clone https://github.com/paulgclark/grc-install
cd grc-install/install_scripts
./flabs_training_setup_24_04.sh

When the script completes, reboot. Then click your login icon. Before entering your password and completing your login, click the little gear in the bottom right of your screen to select “Ubuntu on Xorg”:

Complete your login, and you’re done! You will only need to select Xorg once – all subsequent logins will default to Xorg unless you change it back.

Testing Your Installation – Software

All of the test flowgraphs are contained in the grc subdirectory of the grc-install repo you cloned earlier. Change to that directory before proceeding2:

cd ~/grc-install

Running the following flowgraph will test GNU Radio Companion, as well as gr-satellites and gr-reveng:

gnuradio-companion grc/gfsk_loopback_sim.grc

After the flowgraph loads, click the Execute button in the toolbar (it looks like a Play ▶️ button). If the installation went well, you’ll see a stream of messages stating “It works!” in the bottom left console. You can close the execution window to kill the simulation.

Testing Your Installation – Pluto SDR Drivers

If you have a PlutoSDR, you can test that hardware support was correctly installed by plugging in your SDR hardware, then bringing up an FM receiver flowgraph with:

gnuradio-companion grc/pluto/fm_rx_hw_pluto.grc

Running the flowgraph will bring up a window that allows you to tune the FM receiver. Use the slider to select the frequency of a station known to broadcast in your area3 to listen.

Testing Your Installation – USRP/UHD SDR Drivers

If you have a USRP SDR, you can test that hardware support was correctly installed by plugging in your SDR hardware, then bringing up an FM receiver flowgraph with:

gnuradio-companion grc/uhd/fm_rx_hw_uhd.grc

Running the flowgraph will bring up a window that allows you to tune the FM receiver. Use the slider to select the frequency of a station known to broadcast in your area to listen.

Testing fosphor

Foshpor is an incredible visualization tool, but it can be tricky to set up depending on your CPU and graphics hardware. To see if your installation has worked, you can run one of the following flowgraphs:

gnuradio-companion grc/fosphor/fosphor-pluto.grc
gnuradio-companion grc/fosphor/fosphor-uhd.grc

You may need to click the corner of the execution window and stretch it out to see the display properly:

  1. This process is intended only for Ubuntu 24.04 computers running on x64 CPUs – no promises if you try it on a different platform ↩︎
  2. I’m assuming you cloned grc-install into your home directory. If you put it somewhere else, adjust your path accordingly. ↩︎
  3. For example, 98.1 FM would be entered as “98.1M” after which you would hit the Enter key ↩︎

USRP and LimeSDR Support – RadioConda on Windows

TLDR: To add support for USRP and LimeSDR to a RadioConda installation on Windows, download and run the appropriate installers.

The rest of this post will provide a step-by-step process for adding USRP and LimeSDR support to RadioConda on your Windows PC as well as building a quick flowgraph to test the installation.

This walkthrough assumes that you have installed RadioConda on your PC. If you need to do so, check out my previous post.

Installing USRP Support

Go to the RadioConda GitHub Page and find the hardware support section

Clicking the “UHD (setup)” link leads you down the page to the following:

Clicking the “from the Ettus site” link takes you to the Ettus support page:

We’ll be following the instructions shown there. Start by downloading the driver from the UHD wiki page link.

If using the Edge browser, your computer may try to block the download. Click on the downloads icon in your toolbar and direct your browser to keep the file. Then navigate to your Downloads folder (or wherever you saved the file) and extract the contents of the file.

Then open your Windows Device Manager by typing “device” into the start bar:

Make sure you don’t have your USRP hardware plugged in at this point. You may see a few devices listed in the category “Other Devices”:

When you plug in your USRP, you will see a new device appear in the “Other Devices” group, likely with the name Westbridge.

Right click on the new device and select “Update driver”

In the resulting window, select “Browse my computer for drivers”

Navigate to the location of the extracted files you downloaded from Ettus:

When asked if you would like to install the device software, click “Install.”

After a few moments, the driver installation will complete.

Return to your device manager, where the Westbridge entry should have been replaced by a USRP entry.

Testing the USRP Drivers

Bring up GNU Radio by typing GNU into the start bar or clicking the shortcut you’ve made

Create a flowgraph as follows:

  1. change existing samp_rate variable to “10e6”
  2. add a UHD: USRP Source with
    • RF Options -> Ch0 Center Freq (Hz): 98e6
    • RF Options -> Ch0 Gain Value: 40
    • RF Options -> Ch0 Antenna: RX2
  3. add a QT GUI Frequency Sink with
    • General -> Center Frequency (Hz): 98e6
  4. Connect the source output to the sink input
  5. Save the flowgraph

Attach your USRP to the PC via USB. After executing the flowgraph using the Play button in the toolbar, you should a live frequency plot several FM broadcast signals. The specific frequencies you observe will be different depending on the FM broadcasts in your area.

Installing LimeSDR Support

Although the RadioConda GitHub Page recommends using the Zadig software to install USB drivers, I had trouble getting this to work. Instead, I followed the instructions on the LimeSDR support page at MyriadRF. This directed me to the FTDI Driver Download page. Click the FTDI link scroll down to the Windows drivers. Select the “setup executable” and save it.

Double-click the saved installer and follow the dialog prompts.

Testing the LimeSDR Drivers

Bring up GNU Radio by typing GNU into the start bar or clicking the shortcut you’ve made

Create a flowgraph as follows:

  1. change existing samp_rate variable to “10e6”
  2. add a Soapy LimeSDR Source with
    • RF Options -> Bandwidth: 0
    • RF Options -> Center Freq (Hz): 98e6
  3. add a QT GUI Frequency Sink with
    • General -> Center Frequency (Hz): 98e6
  4. Connect the source output to the sink input
  5. Save the flowgraph

Attach your LimeSDR to the PC via USB. After executing the flowgraph using the Play button in the toolbar, you should a live frequency plot several FM broadcast signals. The specific frequencies you observe will be different depending on the FM broadcasts in your area.

RadioConda – Installing GNU Radio on Windows

TLDR: To install GNU Radio on Windows, just install RadioConda and the drivers for your SDR. Create a shortcut, double-click, and you’re running GNU Radio Companion! For hardware support, simply install the drivers for your platform.

The longer version of this post will provide a step-by-step process for using RadioConda to install GNU Radio on your Windows PC as well as building a quick flowgraph to test the installation. I’ll also show you how to enable support for the following hardware:

  • HackRF
  • PlutoSDR

In addition, I’ll introduce Python virtual environments in general, Conda more specifically, and Radioconda more specifically than that.

What are Virtual Environments?

These are configurations for your computer that include a specific version of Python as well as a number of applications, packages, and dependencies. What’s great is that none of this is installed on your machine itself! You can enter the virtual environment, execute applications, and then exit the virtual environment. Upon exiting, your operating system will return to the state it was in prior to entering the virtual environment.

What is Conda?

Conda is a powerful management tool for virtual environments. You can use it to create any number of Conda environments, and use very simple commands to install hundreds of packages.

What is Mamba?

Mamba is essentially an optimized, higher-performing version of Conda (stuff installs faster).

What is RadioConda?

Finally, we’ve arrived at the tool we’re going to use! RadioConda is based on Conda, but its default configuration includes a ton of SDR-specific packages, such as GNU Radio, RF apps, SDR hardware support, and many key out-of-tree modules. Installing it on your Windows, Linux, or Mac machine will give you an enormous amount of SDR software. And like any other Conda environment, you can enter and exit it at will, leaving your core operating system unaffected.

RadioConda Installation Process for Windows

Navigate to the RadioConda GitHub Page:


Download the Windows installer. If using Edge, you may be temporarily prevented from completing the download. If you click on the downloads button on the upper right, you may see this warning:

Click on the three dots to select “Keep”

And then confirm by selecting “Keep anyway”

Your download should then show as complete

Double-click the installer

Agree to the license

Choose the scope of the installation (“Just Me” is good for most users, unless you want multiple users to have access the software on your machine)

Select a location for the installed files (or just click “Install” to accept the default)

The install will take a few minutes. Click “Next” when it completes

Then click “Finish”

You can now access GNU Radio Companion from your start bar by typing “gnu”

It’s a good idea to click “Pin to taskbar” if you want easy access

Installing HackRF Support

Go back to the RadioConda GitHub Page and find the hardware support section

Clicking the “HackRF (setup)” link leads you down the page to the following:

Clicking the “Install the WinUSB driver with Zadig” link moves you further down the page to this:

Clicking the “Zadig” link takes you to this site, which hosts a general purpose USB driver for windows devices

Scrolling down a bit, you’ll find a download link for the most recent version of the driver. Note that the advertising on this site is… extensive… and that there are may be several other links appearing to be downloads. The “Zadig 2.9” link below is the one you want (although the version may have changed by the time you read this post)

Double-click the installer, and allow it to check for updates online

Then click “Install WCID Driver”

Installing PlutoSDR Support

Go back to the RadioConda GitHub Page and find the hardware support section

Click the “libiio (setup)” link, which leads you down the page to this

Click the link to download, then run the installer, accepting the license agreement

Confirm (or modify) the install location

Then confirm to begin installing

This brings you to an installer wizard, at which you click “Next”

Confirm install from Analog Devices

And Finish

Testing the Installation – HackRF

Bring up GNU Radio by typing GNU into the start bar or clicking the shortcut you’ve made

On the first attempt, I’ve seen a glitch where only a blank window appears. In that case, close the blank window and try again. You should then see the GNU Radio Companion interface.

Create a flowgraph as follows:

  1. change existing samp_rate variable to “10e6”
  2. add a Soapy HackRF Source with
    • RF Options -> Bandwidth: samp_rate
    • RF Options -> Center Freq (Hz): 98e6
  3. add a QT GUI Frequency Sink with
    • General -> Center Frequency (Hz): 98e6
  4. Connect the source output to the sink input
  5. Save the flowgraph

Attach your HackRF to the PC via USB. After executing the flowgraph using the Play button in the toolbar, you should a live frequency plot several FM broadcast signals. The specific frequencies you observe will be different depending on the FM broadcasts in your area.

Testing the Installation – PlutoSDR

Bring up GNU Radio by typing GNU into the start bar or clicking the shortcut you’ve made

On the first attempt, I’ve seen a glitch where only a blank window appears. In that case, close the blank window and try again. You should then see the GNU Radio Companion interface.

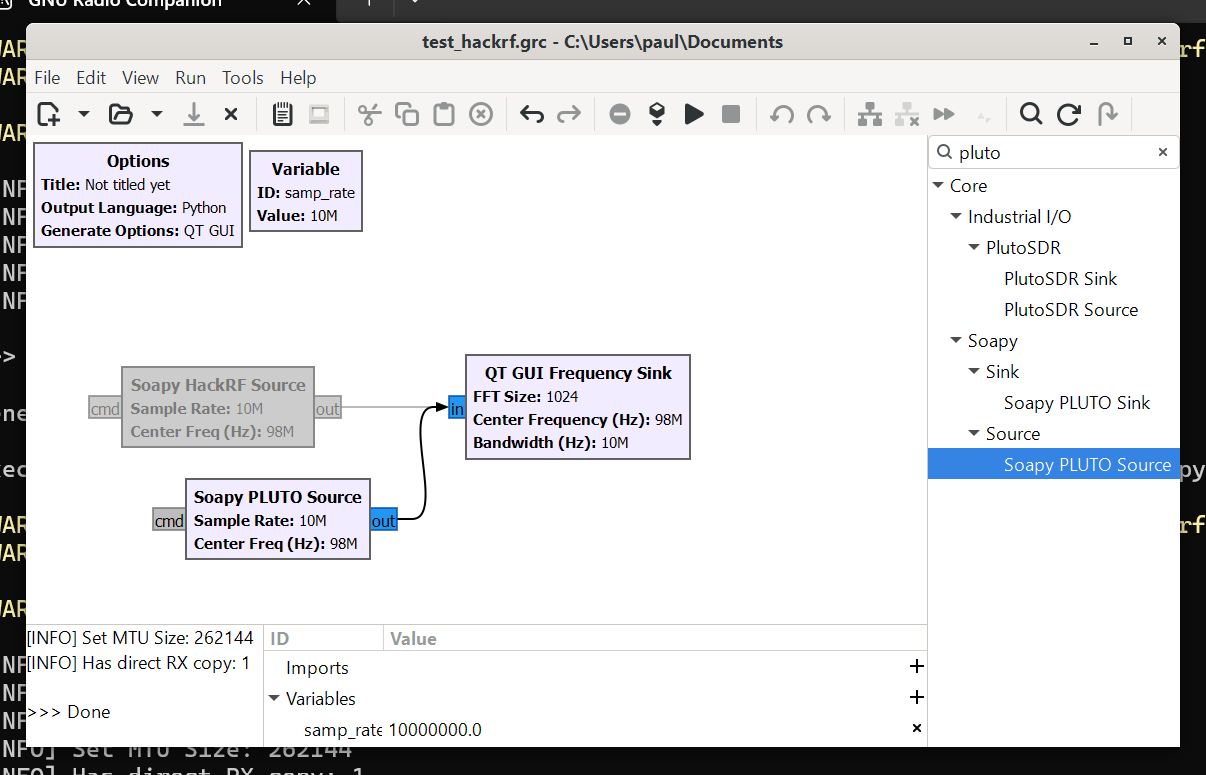
Create a flowgraph as follows:

  1. change existing samp_rate variable to “10e6”
  2. add a Soapy PLUTO Source with
    • RF Options -> Bandwidth: samp_rate
    • RF Options -> Center Freq (Hz): 98e6
  3. add a QT GUI Frequency Sink with
    • General -> Center Frequency (Hz): 98e6
  4. Connect the source output to the sink input
  5. Save the flowgraph

Attach your PlutoSDR to the PC via USB. After executing the flowgraph using the Play button in the toolbar, you should a live frequency plot several FM broadcast signals. The specific frequencies you observe will be different depending on the FM broadcasts in your area.

Updated gnuradio Install Instructions

As some of you have noted, the installation instructions for gnuradio and HackRF contained in our Field Expedient SDR series no longer work. To remedy this I’ve created a set of installation scripts that automate nearly all of the steps required, updated for newer versions of gnuradio/uhd/osmosdr and supporting the Ubuntu 18.04 LTS.

The scripts install from specific releases and commits of the source code, so they should be much more stable than previous iterations of the instructions.

TLDR

On an Ubuntu 18.04 installation perform the following:

  1. Open a new terminal (Ctl+Alt+t) and type:
    sudo apt -y install git
    mkdir -p install
    cd install
    git clone https://github.com/paulgclark/grc-install
    cd grc-install/install_scripts
    sudo ./grc_from_source.sh

    (This will install both gnuradio and the UHD drivers. It will take between 0.5 to 1.5 hours.)
  2. Open a new terminal and type:
    cd install/grc-install/install_scripts
    ./hackrf_from_source.sh
    (This will install the hackrf tools and the osmocom blocks. It will take only a few minutes.)
  3. Open a third terminal and start gnuradio companion with:
    gnuradio-companion
  4. Depending on the hardware you have available, you can open the following flowgraphs inside gnuradio-companion to test your setup:
    ~/install/grc-install/grc/hackrf-test/fm_receiver_hardware.grc
    ~/install/grc-install/grc/uhd-test/fm_receiver_hardware.grc

Installing gnuradio 3.8

By default the gnuradio install script installs version 3.7.13.5, the latest release before 3.8. If you want to try out the new version, simply type:
sudo ./grc_from_source.sh 3.8

Note that the osmocom team hasn’t yet updated the blocks used for interfacing with the HackRF such that they work with version 3.8 of gnuradio. I’ve instead used Igor Freire‘s fork of their repository (actually, it’s his fork of Mickey Vänskä‘s fork of the osmocom repo). Thanks to both Igor and Mickey!

Installation Scheme

One of the big benefits of the PyBOMBS scheme we originally used in the book was the fact that it installs everything to a target directory under your home directory, rather than doing a global install to root-owned directories. The environment is then loaded with a simple call to a setup_env.sh script generated by the install process (which is automatically added to your ~/.bashrc).

This means if something goes wrong, you can just rm -r the target directory and delete a single line from your .bashrc file. You can then start over without worrying about the previous install polluting your environment.

I’ve preserved this scheme in the new scripts as well. By default the scripts will use the following directory for the target:
~/install/sdr

If you want to use a different target, simply run the script with the new target directory as the second argument. If installing 3.7 this would be:
sudo ./grc_from_source.sh 3.7 ~/install2

For 3.8, it would be
sudo ./grc_from_source.sh 3.8 ~/install2

This installation flow also allows you to easily keep multiple versions of gnuradio on disk. You simply install 3.7 to one target directory and 3.8 to another. You then enable the setup_env.sh file corresponding to the one you want to use at any given moment.

Conclusion

I’ve tested these scripts on numerous laptops and believe I’ve worked out all the issues with both Ettus and HackRF hardware. If you do have an issue, please let me know on GitHub or via email.

Updated gnuradio Install Instructions

We’ve gotten some feedback recently from a number of our readers that the gnuradio installation process documented in our books (and on our books’ web site) has a few glitches. We knew that we’d need to update the instructions at some point, and the time had definitely come. If you’re planning on installing gnuradio any time soon, please see our updated instructions pdf.